Article content
1. How do I prepare my surface for Durabak?
2. How do I test if my surface is ready for an application of Durabak?
4. What can I use to apply Durabak?
6. How much coverage will I get with one gallon of Durabak?
7. Can I 'get away' with applying only one coat of Durabak?
8. Can I apply more than two coats of Durabak?
9. I have some Durabak left over. How should I reseal it?
10. Which Durabak is right for me?
11. Can I mix Durabak to make custom colors? (Tinting)
12. How do I clean Durabak coated surfaces?
13. Who may I speak with for more technical assistance?
1. How do I prepare my surface for Durabak?
Please see our Surface Prep Guide (.pdf)
2. How do I test if my surface is ready for an application of Durabak?
Always use the 2 inch patch test. When you think your substrate surface is ready to go: take a 2 inch throw away chip brush, and apply some 2 inch by 2 inch patches onto your prepared substrate. Look for any variations in color or texture of surface and put a patch in those areas. Use the first day to prep your substrate. Just before you go home, apply the patches. Let them sit for 8 to 10 hours at least. By then the Durabak is dried and is starting to cure-out, and is like a very stiff rubber band. Place a pocket knife blade under the Durabak on top of the substrate, and pull straight up. The Durabak material will stretch like a stiff rubber band and your knife blade should eventually cut through the material. If this happens, you are ready to go. If the patch peals up, look at the back side. You will see one of two things; Either it is going to have a lot of dust and debris on it - and then you would need to re-clean the area - or the back side will be very shiny. If it is shiny and dry, you need a water based urethane primer on only that area of your test. If it is shiny and slimy, either the surface needs to be re-cleaned, or there is oil in your substrate, and an oil or solvent base urethane primer must be used. Please test all projects before the application, because it may save you from untold problems. Our goal is for you to have a great project to remember, not one that requires extensive reworking.
3. How do I apply Durabak?
Please see our Application Instructions (.pdf)
4. What can I use to apply Durabak?
Durabak can be applied with a spray gun, brush or roller. We recommend using Cote-L's stipple roller covers to apply the non slip Durabak if it is not to be sprayed on. A brush can always be used to apply the Durabak.
5. Can I spray Durabak?
You need a nozzle that will pass 10 mil rubber chips, and the o-rings of the gun must be able to sustain the use of xylene.
6. How much coverage will I get with one gallon of Durabak?
A gallon of Durabak non-slip will cover about 60 square feet, at 15 wet mils (using the recommended 2 coats). A gallon of smooth Durabak will cover 110 sq ft at 15 wet mils. As a hint, a 3/8 inch nap roller cage or the Cote-L stipple rollers will apply 12 to 15 wet mils naturally. A 3/16 inch lamb skin roller will apply 10 to 12 wet mils naturally. A quart of Durabak non-slip will cover 15 square feet at 15 wet mils. These numbers are subject to some variability due to external factors, such as the porosity of the surface.
7. Can I 'get away' with applying only one coat of Durabak?
Yes/ No. Durabak is a self leveling product. If the surface profile is greater than the wet mil coverage of the top of the surface profile, you run the risk of not sealing the surface of the substrate, and water getting into and under the Durabak material. This will cause the substrate surface to fail, and callusing Durabak material to peal bonded onto the substrate material that failed. The second coat is crucial to the long term durability of the product. It is responsible for creating a single membrane that strengthens the bond between the surface and the Durabak. The second item to consider is the weight of the force being applied to the surface of the Durabak material. The heavier the force, the thicker the dry mils of the Durabak required. Feel free to call us for more detailed information! (201) 379-5366
8. Can I apply more than two coats of Durabak?
Yes. While two coats is the recommended minimum, you will get even more durability with a third coat. In applications where extra thickness of the Durabak material is needed to sustain the abuse of the surface traffic such as car driving lanes, it is recommended that a third coat of Durabak at 15 wet mils be used and a silicon carbide powered be applied to the wet surface of the third coat of Durabak material.
9. I have some Durabak left over. How should I reseal it?
Durabak is a very strong polyurethane. After opening the can (and before use), place blue carpenter tape on the can rim. Before closing the can, pull off the carpenter tape, and clean the rim and can lid very well, or you will not get the can open again without peeling the lid off the can. Place 5 to 7 oz of xylene into the can. Then seal it. We advise storing Durabak with the lid closed very tightly and with the can upside down. If Durabak is stored with the lid up, the Durabak on the lid may cure, making it very difficult to open for its next use.
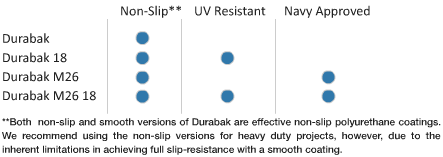
10. Which Durabak is right for me?
11. Can I mix Durabak to make custom colors? (Tinting)
Cote-l industry produces Durabak in four different versions with 16 standard colors.
Custom colors can be produced to any standard, given sufficient lead time and a minimum order of 75 gallons.
There are other possibilities to modify the color of the product. (1) it can be accomplished by mixing together two or more existing colors of the same version of Durabak in order to achieve a third color. It is very important that the mixing of colors will be done between Durabak-to-Durabak or Durabak18UV-to-Durabak18 UV only. For obvious reasons, it is easier to create from lighter colors to darker, than to start with a dark color and expect to make it lighter. The principle is, if you want a pastel shade, start with white and build it up. For example, to achieve pale yellow, take our standard yellow and add it to white. (2) a color change can also be achieved by taking the product to your local specialty paint shop and have them add pigments. Pigments come in two different forms: paste and powder. It is always better to use the paste form rather than the powder. The instructions for that process are very simple. The pigments should not be water-based. The pigments should be compatible with one-part moisture-cured polyurethanes, so that there will be no reactive process with isocyanate. Also, it is important to mix the contents of the can very well, but never to shake it. It is better to do this kind of tinting immediately before making the application. Also, there is a need to make sure that, after tinting the contents of the can, the lid should be securely closed to prevent premature curing of the moisture-cured product.
Durabak 18 UV is also available in clear. In the use of pigments for achieving pastel shades such as yellow, light grey, medium blue, light blue, medium grey, cream, orange, and other similarly light colors, it is better to start with white, rather than clear, and build it up. For richer colors, such as blue, green, or black, it is better to start with clear.
12. How do I clean Durabak coated surfaces?
The most successful removal of water-based dirt from the Durabak surface has been with Handy Andy, an ammonia-containing household cleaner and a nailbrush, while oil-based dirt was best removed with methylated spirits (meths) and a nailbrush. The surface can best be returned to almost original condition by first cleaning with Handy Andy and then Meths. For more, see our Care & Maintenance page.
13. Who may I speak with for more technical assistance?
Contact Us
Always e-mail any questions to our site, and we will get back to you quickly. If the question or answer needs more input, put your telephone number down so we can call you.