Article content
Repairing leaking joints, both vertical to horizontal and just horizontal, can be a struggle if you don't know how to or are lacking the proper materials. The following is a horizontal joint and a vertical joint around a leaking compartment movable vent cover. In order to repair leaking joints, you should follow these steps:
First you need to clean the grease, slime, and loose material around the area to be repaired. Then you need some cotton/fiberglass fleece, Durabak smooth or non-slip, scissors, some blue painter's tape, a mixing stick, and a few minutes of nice weather.

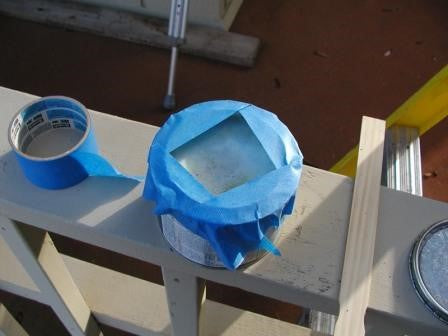
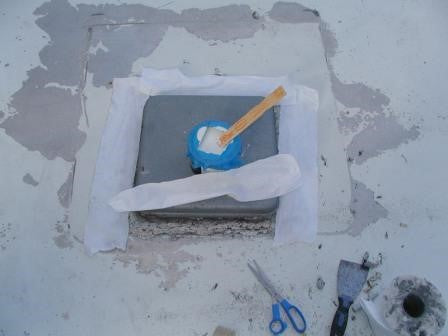
After the area to be sealed is clean, open the can of Durabak and apply some blue painters tape around the can edges. This will allow you to mix up the material and use it out of the can and not get the top of the can dirty so the lid of the can will close and be able to open later. If the lid gets material on it and it is not cleaned, the next time you try to open the can of Durabak, it will be a LOT harder. Mix up the Durabak material.
With the area around the vent lid clean and dry, cut four pieces of fleece the length of the lid. These pieces of fleece may need to be trimmed for the final application but will be okay until later in the process.

Now that the fleece is cut, you can apply the Durabak to the area where the fleece is going to go, or apply some Durabak to the fleece and then lay it where you want it, pull it up and use the outline to apply Durabak to the area of the repair that needs the material. In the following photo you will see that Durabak was applied to the fleece and the fleece was laid in place, then removed and more Durabak was applied onto the horizontal and vertical area, then the fleece was laid back into the Durabak in the repaired area. Next you will want to apply some Durabak to the fleece. This can be done with a brush or just put the piece of fleece into the Durabak can and wet the fleece. When you remove the fleece from the can, squeeze out 85% of the material on the fleece. You want the fleece wet, but not dripping with material. You can apply it with a brush in small areas like this almost as easy, because you do not want the fleece dripping with material only wet to the sight. If you apply the dry fleece to the area that you have applied Durabak to and the fleece is not wet, the fleece will absorb the Durabak from the repair area, and there will not be enough Durabak on the repair area to make a good mechanical bond, and then the fleece will just pull up. If you apply fleece that is dripping with Durabak to the area that you have applied the Durabak and there is too much material on the repair area and the fleece you will get a drying bubble under the fleece and that will not look good. It may also leak. You want to apply about 15 wet mils of Durabak to the repair area (the thickness of most business cards) and just have the fleece wet. Now the chemical reaction of the Durabak will start, the vapors of the drying process will flow though the fleece and everything will dry as one solid piece.
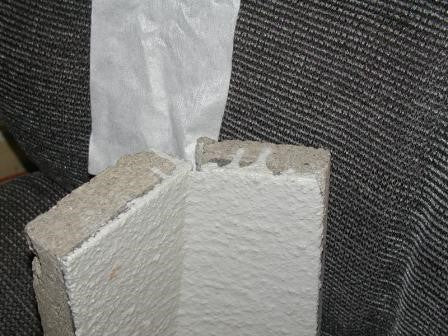
Here on the side of the hinge, the fleece is laid flat, but on the other three sides, the fleece is installed up the vertical side, under the vent can and out onto the horizontal face of the trailer.

Now allow the Durabak on the repair area and in the fleece to dry. Usually about 45 to 75 minutes on a 65 degree day, shorter on a warmer day, and longer on a cool day. Do not apply this fix in open sun or on 95 degree and above days. The Durabak on the repair area will not dry before the Durabak on the fleece will and you will get a bubble under the fleece. This is not a disaster if it happens. You will just need to do one of two things.
You can either make a slice into the middle of the bubble and if the material under the bubble is still soft, just brush the fleece back into the wet material, leaving the slice to act as a path to allow the gas from the drying Durabak to flow through.
The other option is if the Durabak is dry under the bubble, just cut out the bubble, then cut a piece of fleece about a ¼” smaller than the shape of the bubble, dip the fleece into the Durabak, (this time leaving the fleece very wet, but not dripping) and install the fleece into the bubble area, allowing to dry.
Next, apply another coat of Durabak over the fleece and out past the fleece edge about ¼” inch. To make nice repair lines, install some blue painters tape out past the edge of the fleece about ¼”. Then apply the second coat of Durabak and pull the tape right after the coat is applied.

The repair should look like this. You should not be able to see the fleece. In this repair, the hinge edge was on a roof metal seam joint. The joint was leaking past the vent lid so the repair was extended past the vent lid on the right side. This same fix is used by most trailer manufacturers. In fact most of them apply this to all of their metal seal joints and then coat the total top of the trailers. The fleece acts as a expansion joint allowing the metal to expand and contract, while remaining sealed.
Wherever there is a vertical to horizontal joint exposed to rain, this is a long term joint water intrusion application. Every boat using this application on the vertical to horizontal joints do not experience dry rot or other costly long term repairs.
Commercial buildings engineers have seen the value of this type of application.


Building penetrations do not have to be a problem. Commercial evaporators cooling towers using this application before commissioning have eliminated costly long term maintenance costs. This repair has been used on old evaporator cooling tanks where the metal was so thin you could not walk inside of them to repair them. After the repair, the cooling towers were returned to production within 48 hours. This application has saved hundreds of thousands of dollars in a single repair.